Today starts a series of posts for the Audie Playsuit sewalong that will help you get the perfect fit. We are starting with the bodice!
The Audie Playsuit features princess seams in the bodice. Princess seams are great for creating a smooth fit across the bust that ideally follows the curves of the body. However, as you know, all bodies are different! Thats where pattern adjustments come in.
There are lots of different ways to adjust a princess seamed bodice for the perfect fit. Today I will cover the two most common: an FBA (full bust adjustment) and lowering the apex. These adjustments came up the most among my pattern testers. If there is something else you’d like to see covered here regarding the bodice, please let me know in the comments below!
Full Bust Adjustment

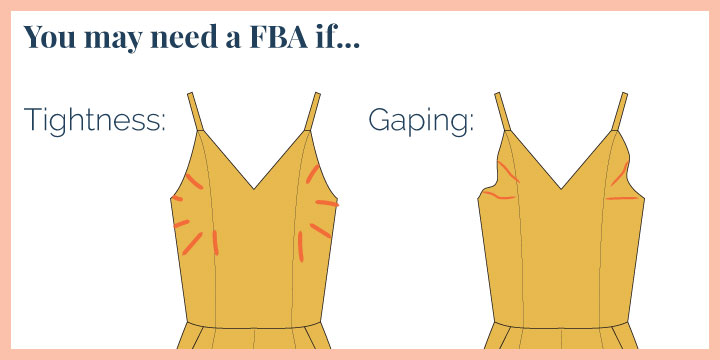
If you are experiencing tightness across the bust, but the garment is fitting you everywhere else including the shoulders and waist, you may need a full bust adjustment. This could be indicated by diagonal drag lines pulling out from your bust. Conversely, if the garment fits across the bust, but you have gaping in the front armscye and the shoulders are a little big, you may want to size down in the bodice and do a full bust adjustment to the smaller size. This is a very common adjustment as all bodies are unique and the exact proportion of full bust to under bust or high bust can vary greatly.
The Audie Playsuit is drafted for a B cup in sizes 0-14 and a D cup in sizes 16-32. If you aren’t sure of your cup size, measure the difference between your under bust (across your ribs directly under your breasts, generally where most bra bands will sit) and your full bust (across the fullest part of your bust). Note: some folks like to measure their high bust (under the armpits and across the upper area of the chest) instead of their under bust. Sometimes this can ensure a better fit in the armscye and shoulders.
In general, each inch of difference is going to indicate a cup size. (1″ = A cup, 2″ = B cup, etc.) However this is not set in stone across brands and should not be 100% relied on as accurate (ever worn two different bra sizes depending on what brand you buy?)
For the sake of doing the full bust adjustment to the Audie Playsuit, I’d recommend adding 1″ across the bust for each cup size you’d like to increase. Keep in mind the flat pattern only represents half of the body, so that means you are adding 1/2″ for each cup size when you do the adjustment.
If you want a more concrete measurement, make a muslin of just the bodice. Open up the princess seams in between the two bust notches and try it on. No… this isn’t turning into a Cardi B costume ;-P. How ever much gaping you have in between the stitch lines at the fullest part of your bust is how much you need to add in your adjustment. If both sides are different, combine the measurements and divide in half to get your amount.
Ok, I think we are finally ready to get to the fun part! Keep in mind this same adjustment can be made to any garment with a princess seam!
I don’t currently have a video tutorial for doing a small bust adjustment, but it is essentially the same as a full bust adjustment except everything is moving in the opposite direction! If you’d like to see this in action, let me know in the comments below!
Lowering the Apex

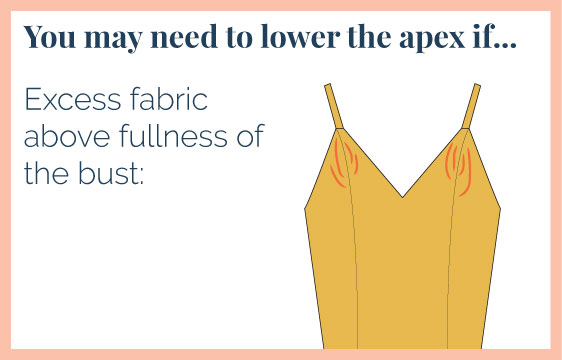
Lowering the apex will be a common adjustment if you plan on wearing this jumpsuit without a bra, if you have had children, and well if the ladies just aren’t sitting where they used to. This adjustment is indicated by pooling and ripples above the fullness of the bust. It may feel like you have extra fabric there because, well you do!
This adjustment is super easy and doesn’t require a ton of measuring. To determine how much you need to lower the apex you can either make a muslin and mark your apex on the muslin (generally the nipple point or fullest point of bust). Then, disassemble the muslin and compare it to the pattern piece. The apex is not marked on the pattern but you can get an idea of where it hits based on the fullest part of the side front piece. Note the difference and use this measurement to shift your apex.
NOTE: if you are planning on doing BOTH a full bust adjustment AND lowering the apex, you should lower the apex first. The full bust adjustment happens from the apex, and you don’t want to add fullness in the wrong spot.
Now let’s see how its done:
Lengthening the bodice
The last adjustment you may need is to add length to the bodice. Keep in mind that doing a full bust adjustment will give you extra length as well, so do this adjustment first if you require it to see where that leaves you.
Bodice length measurements are included in the finished garment measurements of the pattern, so you should be able to know whether or not you need this adjustment before even making a muslin (see note in paragraph above). Measure on your body from your shoulder just below the base of your neck, down over the fulness of your bust to your natural waist. If this measurement is longer than the measurement provided in the pattern instructions, you should probably lengthen your bodice.
Lengthening pattern pieces is super easy, a great beginner pattern adjustment. Follow the tutorial in the video below. Don’t forget to keep your grainlines lined up. And remember, this adjustment will need to be done to all pieces of the bodice (center front, side front, side back, center back).
And that just about covers the three main adjustments you may need to make to the Audie Playsuit. If you have any questions, don’t hesitate to leave a comment below or shoot me an email!
Next week we will be covering the bottom half of the Audie Playsuit… stay tuned!

This is so useful – thank you for such clear instructions!
you are quite welcome!
I would love a video showing how to go from D cup to a C or B. It’s hard to visualize the process from watching the FBA. Thank you!