This week in the Audie Playsuit sewalong we are going to focus on getting just the right fit for the bottom half of the playsuit. Between this week and last week, you will be set up for success and having a great fitting playsuit!
The Rise
Getting the right fit in the rise is a crucial part of any pants fitting process. In a jumpsuit, where the pants and top are connected, it is extra important because no one wants a constant wedgie when wearing a jumpsuit!
For this reason, it was important to me to include finished measurements for the crotch length in the pattern. To find this measurement on your body, hold a tape measure at your center back waistline, send it under your legs and up to your center front waistline. If you aren’t sure where your natural waist is, use this video for help. Once you have this measurement you can compare it to the pattern and get a good idea of what adjustments you need to make.
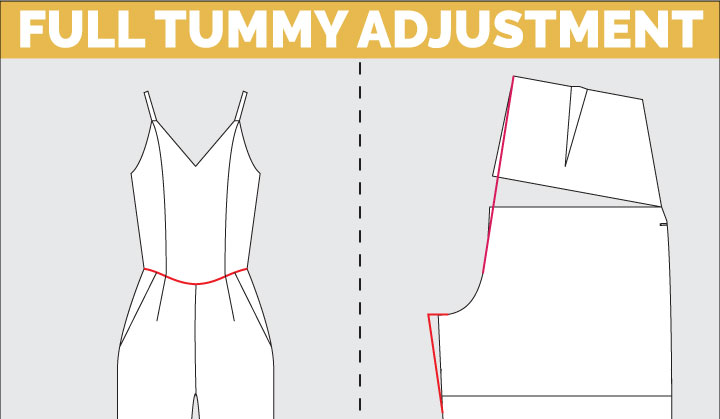
If your crotch length is longer than the pattern, and you know you carry most of your fullness in the front, then you may need a full tummy adjustment. This is also shown by the center front waist seam being pulled downward on your muslin (or having some serious -ahem- camel toe) while the back looks ok.
At the lengthen/shorten line, slash from the center front to the slash pocket line & spread the pattern to add room in the tummy leaving the slash pocket line in tact. You can also extend the front crotch a little for extra comfort.
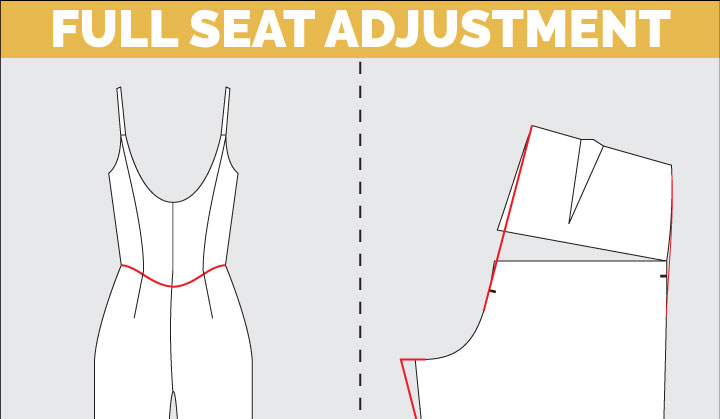
If your crotch length is longer than the pattern, and you know you carry most of your fullness in the rear, then you may need a full seat adjustment. This is also shown by the center back waist seam being pulled downward on your muslin (or having a giant wedgie) while the front looks good.
To do this, at the lengthen/shorten line, slash from the center back to the side seam & spread the pattern to add room in the seat leaving the side seam in tact. You can also extend the front crotch a little for extra comfort. I like to true up the new side seam by smoothing that line where the spread creates an angle as well.
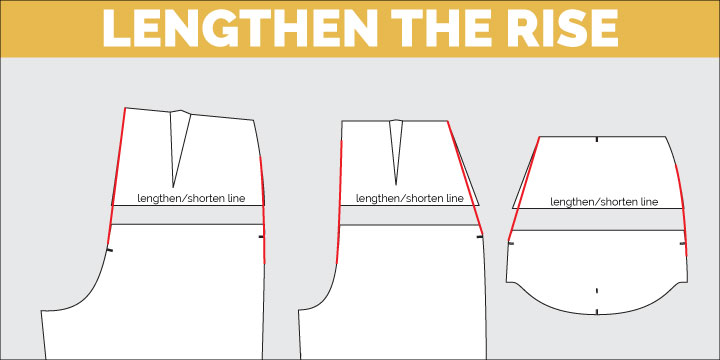
If your crotch length is longer than the pattern, and you carry your fullness evenly you may want to lengthen the rise overall. This can also be shown in a muslin with an overall tight fitting crotch or a waist seam that is being pulled down below the waistline.
Use the lengthen/shorten lines as a guide, and add the same amount across the front, back, and pocket pieces. Keep the grainlines lined up and the cut lines parallel to one another. Keep in mind however much you add will give you double that much extra length in the crotch (i.e. adding 1″ to the rise overall will give you 2 extra inches in crotch).
Adding Length
If you’ve never added length to a pattern before, its quite easy! You can check out my tutorial here:
If you are one of my sewing tall folks, you may want to use the lengthen lines provided to add length in the leg as well.
Since my patterns are drafted for petites (height of 5’4″ and under) I mostly cover adjustments to add length. However, if you need to shorten the pattern or remove length in any of these places, the process is the same just backwards! You are overlapping the pattern pieces instead of adding space.
Changing the leg shape
Perhaps straight legs aren’t your style. Maybe you are more of a tapered leg type of fashionista. Or maybe you like to make a statement with a big flowing wide leg. Changing the shape of the leg is easy!
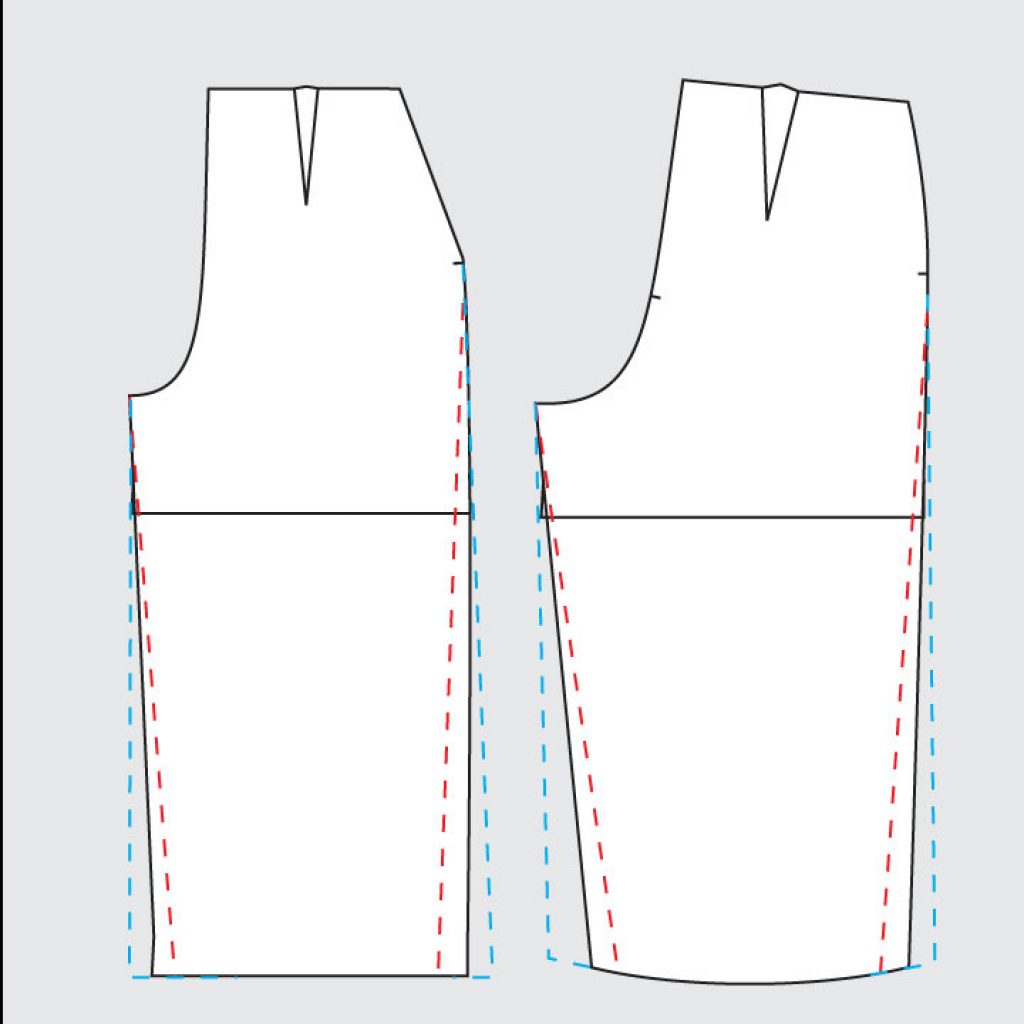
Simply measure the same distance in or out from the side seams & inseams at the hemline, and draw in new seamlines. Side seams should blend into the hip, inseams should meet at the crotchpoint. Narrowing the legs is shown in red, widening shown in blue.
If you are narrowing the leg, you will need to draw in your hem allowance and fold the paper pattern piece up at the hemline before cutting the new leg shape so that the hem allowance is trued up and you are able to turn it under to hem. This can also draw the pant hem upwards so you may want to add a touch of length as well.
That just about wraps up our pants fitting segment of the Audie playsuit sewalong! This is by no means an exhaustive list of possible pants fitting alterations. However, these adjustments came up most frequently during pattern testing. For even more pants adjustments, you can check out this post from the Nita Trousers sewalong!
I’ve got one more post coming for you this week about fit covering blending sizes! Look out for that one tomorrow!

Thank u