Today is a big day! We are covering common fit adjustments you may need to make to your Nita Trousers to get the best fit possible. Have you made a muslin yet? Lets try it on and see what it tells us!
The fit adjustments I’m focusing on today were common adjustments that came up in testing. This is in no way in all-inclusive list of possible fit adjustments you may need for the perfect fitting pair of paints. Pants can be scary to make with all the possible adjustments they can require, but with a little patience and the right resources I believe everyone can achieve their desired fit.
First, I’m going to focus on the adjustments you may immediately know you need to make after looking at the finished measurement size chart. This includes adding length to the leg and crotch, as well as adjusting the thigh area. By comparing your body measurements to the finished measurement chart, you will be able to discern whether you need these adjustments before even making a muslin!
Adding Length
As you know, Amy Nicole Patterns are drafted for petites (height of 5’4″ and under). Therefore, I will only be demonstrating how to add length where needed. However if you find that the length is still too long for you according to the finished measurements, you can do these same adjustments only where I’ve instructed to add space you would instead overlap the pattern pieces. Be sure to true your seam lines in the same way.
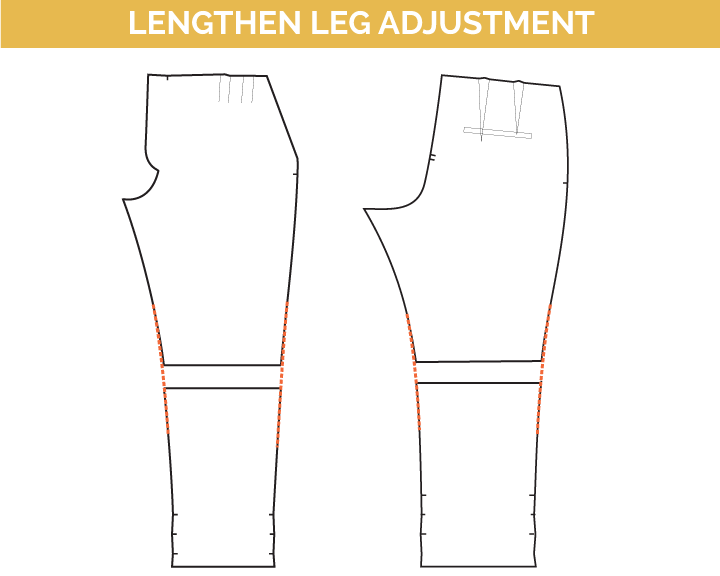
To lengthen the leg, simply cut across the lengthen/shorten line provided in the pattern (right around knee level) and separate the pattern pieces the desired amount. Be sure to keep the cut lines parallel to one another and keep the grain lines lined up. Tape the pieces down on a scrap of pattern paper and true in your new seam lines. To see how adding length to a pattern looks in action, check out this video:
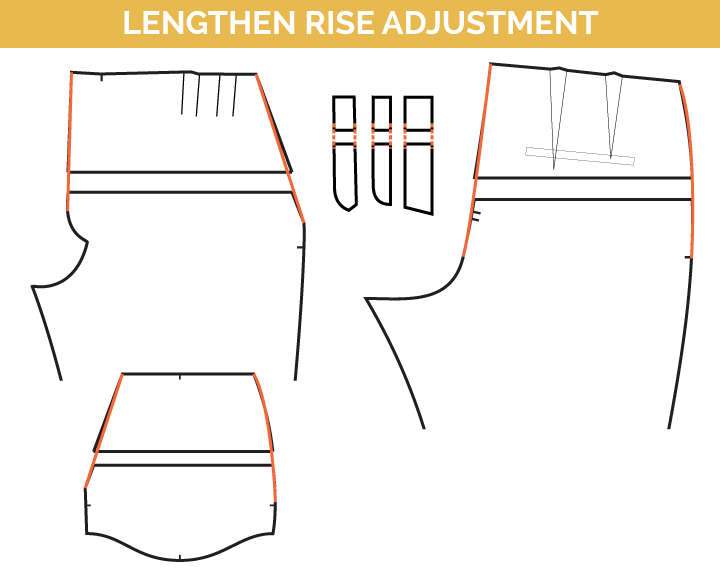
If your crotch length is much longer than designated in the finished measurements, or you know yourself to be long in the torso, you may need to add length to the rise in addition to the leg. Use the same method as with the leg, cutting across the lengthen/shorten lines of the pattern and separating the pieces. For the crotch length, be sure to do this to the pocket, fly interfacing, fly facing, and stitch guide in addition to the front & back pieces.
Full Thigh Adjustment
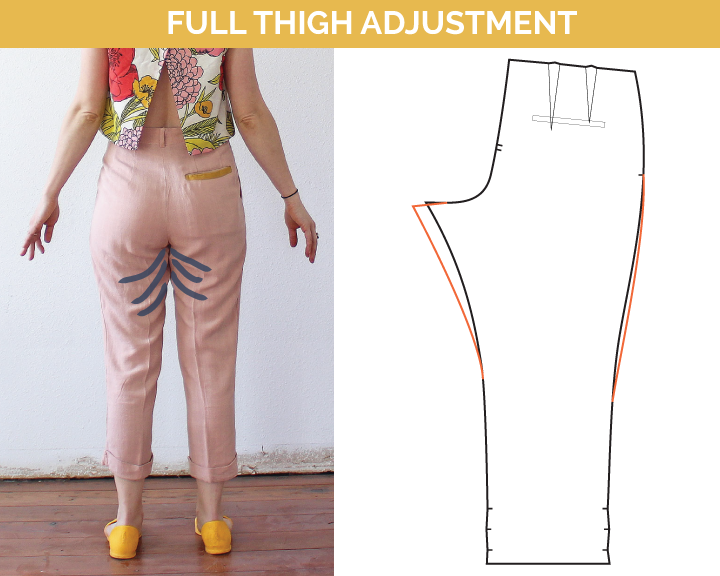
If your thigh circumference is greater than or equal to the finished thigh measurement, or your muslin is showing drag lines pointing toward the inseam/crotch area, you may need more room in the thighs. Extend the crotch point the necessary amount and blend a new line to a point at or below knee level. You can also come out at the side seem between the hip and knee for even more wiggle room. Depending on the amount needed, you may only need to adjust the back leg. However for more than an inch or two I would do this adjustment to the front and back.
Narrow Thigh Adjustment

If you find a lot of bagging in the back leg right under the bum, you may want to adjust for a narrow thigh (adjust the back rise). Come in at the back crotch point and blend into the leg at the knee.
Full Tummy Adjustment
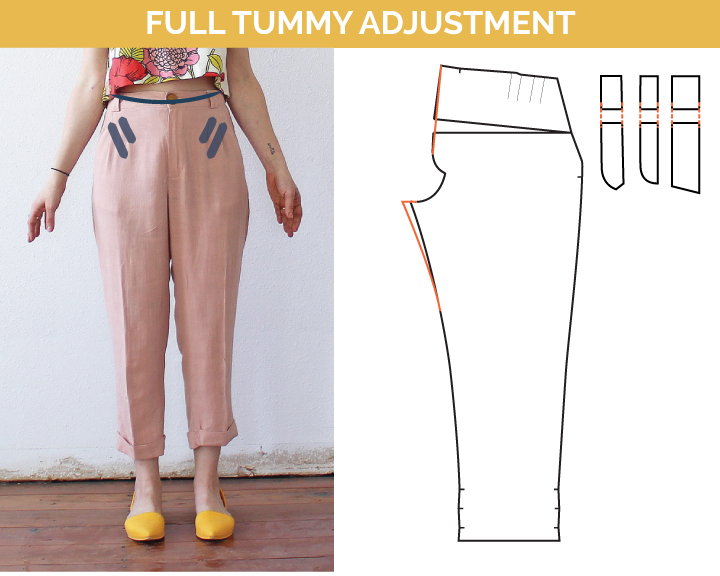
If your crotch length is longer than the finished measurements and you know most of your fullness is present in the tummy, a full tummy adjustment may be for you. In a muslin, you will see drag lines around the tummy area, the front waistline will be pulling down, and the side seam may be pulled toward the front. At the lengthen/shorten line, slash from the center front to the side seam & spread the pattern to add room in the tummy leaving the slash pocket line in tact. You can also extend the front crotch for extra comfort. Be sure to add length to the fly interfacing, fly shield, and stitch guide accordingly.
Lengthen Pleats Adjustment
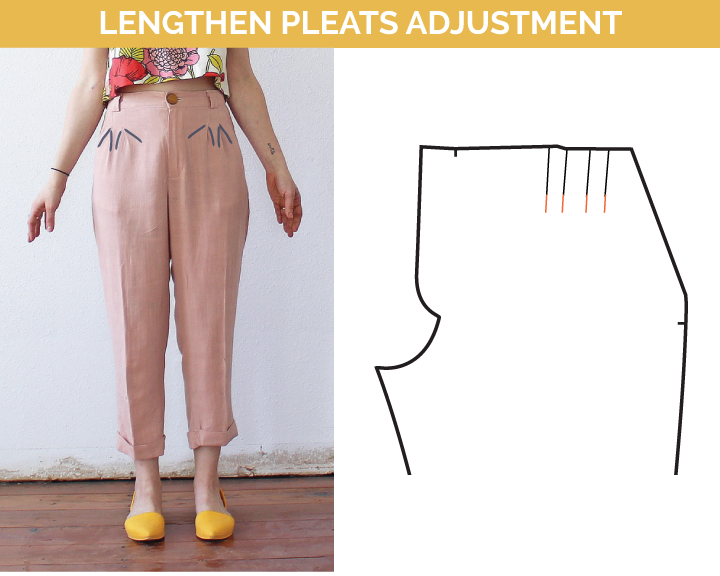
In addition to adding room in the tummy, you may need to adjust the length of the pleats if your pleats are gaping and pulling open. Ideally, the pleats should end at fullest part of your tummy. If they don’t, extend the pleat line as necessary. Be sure to use your ruler to maintain the angle of the pleats when doing so.
Full Seat Adjustment
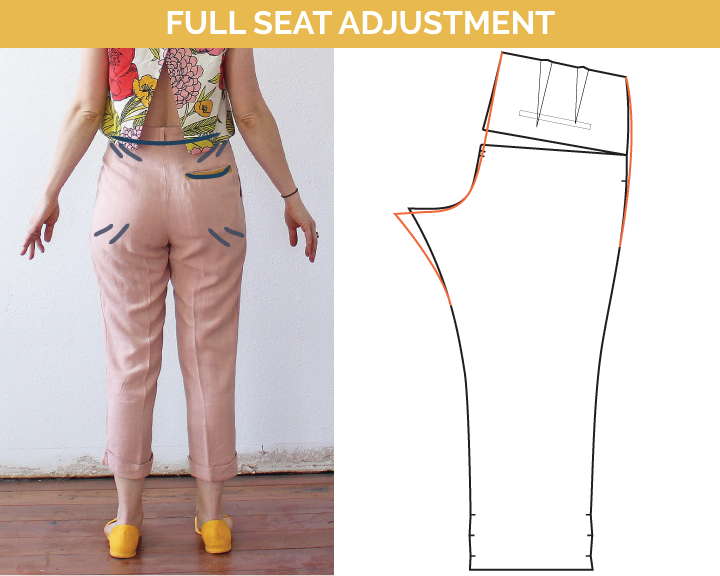
Conversely if the waistband is being pulled down in the back, your pocket is pulling open and you have drag lines pointing toward your bum, you may require a full seat adjustment. It’s basically the same as the front only on the back pieces. Slash and spread at the lengthen/shorten line at center back and extend the back crotch point. I suggest lowering the back crotch point just a tad when you extend. When truing up the hip line, you may want to come out just a tad to make up for any width lost when truing the back crotch and add a little more room.
Adjusting the Taper
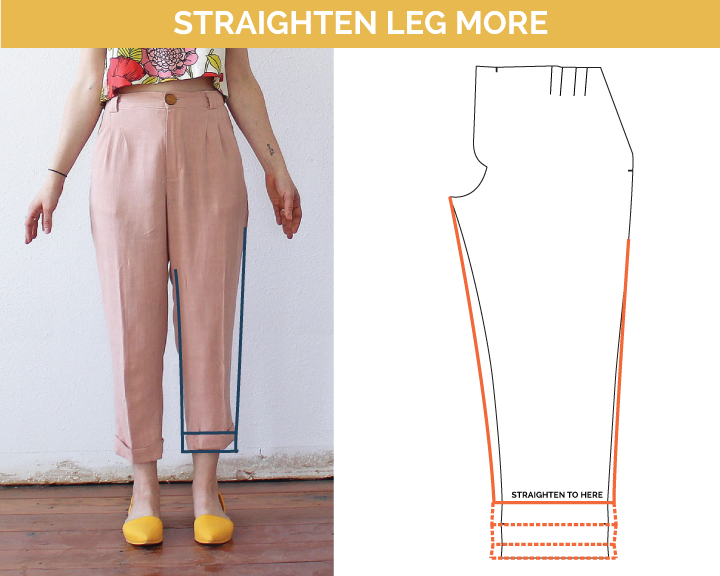
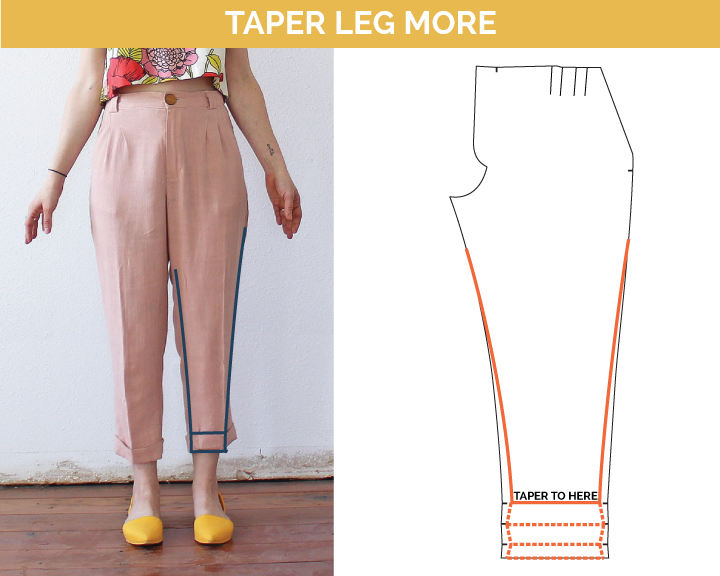
To change the taper of the leg, you need to draw a line across the upper most hem notches and operate from there. Tape a scrap piece of paper behind your pattern piece and remove (adding taper) or add (less taper) width to the hemline. Be sure to add or remove the same amount from both the side seam and inseam. To true up the cuffed hem, draw in fold lines connecting each set of notches and fold the pattern piece under at each line. Then cut the excess paper along the new side seam and inseam. Unfold the paper to reveal the new hem allowance for your cuffed hem (shown in dotted lines above). You will notice that straightening the leg results in a less jagged looking hem allowance and adding more taper does the opposite! IMPORTANT: Be sure to do this to both the front and back leg!
Blend Between Sizes
You may find that the simplest adjustment for you would be to blend between two sizes. For instance, if you fall in a size 14 at the waist but a size 16 at the hip, blending between the two could eliminate the need to make other more complicated adjustments. Watch this video to see how it works:
Additional Resources
As I mentioned above, this is not at all an exhaustive list of possible adjustments that can be made to a pair of pants. Below are just a few resources I recommend for getting the perfect pants fit.
*list contains affiliate links
- Pants for Real People (book) – referenced often by myself when I was drafting this pattern!
- Pants Fitting Basics – Seamwork Article
- Pants making Resources – A great compilation of all the pants fitting articles you could need from the Curvy Sewing Collective!
- Jeans Fitting Adjustments – Closet Case Patterns – this article is more tailored towards jeans making, but the adjustments and knowledge are still quite informative for any pants making project!
Tomorrow we start sewing!

You use the exact same photo of drag lines for the narrow thigh adjustment and full seat adjustment. The adjustments look very different, so I assume there’s an error in picture choice. As these drag lines look like mine, which adjustment is correct?
Hi there! I’m a little uncertain about your confusion as the images fro the two are indeed different. If you have drag lines under the bum along the thighs, and it feels baggy back there, then you would want a narrow thigh adjustment. If you have drag lines around the bum and feel pulling across the bum then you would need a full seat adjustment. I hope that is helpful!
I just found this tutorial and it is one the best summaries of pants fitting I have seen. I plan on referring to this page for my next pair of pants.
One issue I am having a lot of trouble finding tutorials for is the hungry-butt.
My pants are consistently too tight in the rise right at the centre back seam and it draws attention to my low butt.
I have tried lengthening the rise, and extending the crotch curve, but I think I may be doing too much. The result is usually that I have baggy pants and hungry-butt at the same time.
Could you do a tutorial about hungry-butt sometime?
P.S. I wonder if I have a butt that dips below the crotch curve…?
Thank you so much! I would say it definitely sounds like a back crotch shape issue rather than a crotch length issue. I would try maybe rounding out the lower end of the back crotch curve without adding extra length? The added curve should give you the length you need in addition to not making the crotch line want to pull up into the cheeks. :). This would be a great tutorial! Ill keep it in mind 🙂