Let’s be honest, its very rare that we fit perfectly into the size chart of any one brand. Our bodies are all unique, and brands have to use some sort of standard proportions when creating a size chart and drafting patterns. Which means often you will be one size in the bust and waist, but another in the hips. Or maybe you are a different size for each! Luckily for us sewists, we can easily adjust a sewing pattern to be a completely different size at the bust/waist/hip to fit our bodies!
A bit about alignment
Before we get into the technique for actually blending between sizes. It’s important to talk about pattern piece alignment. Not all pattern pieces are aligned the same. I always try to align my pattern pieces in a way that accommodates blending sizes, even though this can often result in a lot of dotted lines really close together. I prefer to hope that my customers are using the layer selection option when printing so they only see the sizes they need to make it much clearer. Some companies like to prioritize the visibility of the pattern lines, or may align differently for various other reasons (i.e. getting the pattern to fit nicer on the pages).
Arbitrary vs. Aligned

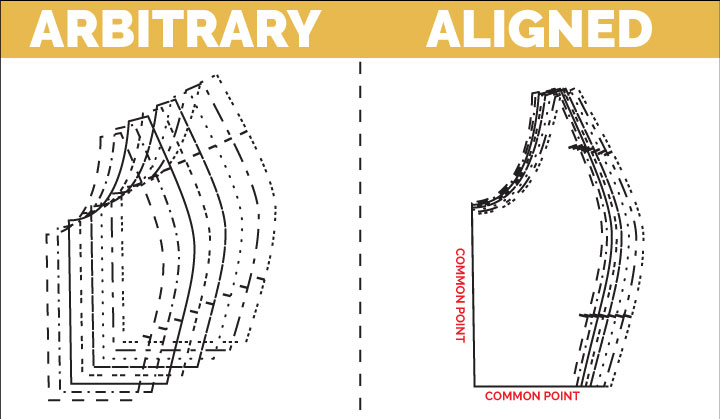
In order to properly blend between sizes, the pattern pieces should be aligned with at least two common points. This could be the top and the center, the bottom and the side, side and the top, etc.
In the example on the right, you can clearly see the full points of the bust and how you could blend those into a different size at the waist. Pattern pieces aligned with two common points ensure that you truly are blending from one size to another and don’t get a distorted patterns shape that won’t fit with other pieces.
The image on the left shows arbitrarily placed pattern pieces. They are spaced out evenly, but the pieces don’t share any common points. If you needed to blend between sizes with a pattern that has arbitrary alignment like this, the best thing to do would be to trace the pieces off onto a new piece of tracing paper so they are aligned properly.
Centered Vs Side alignment

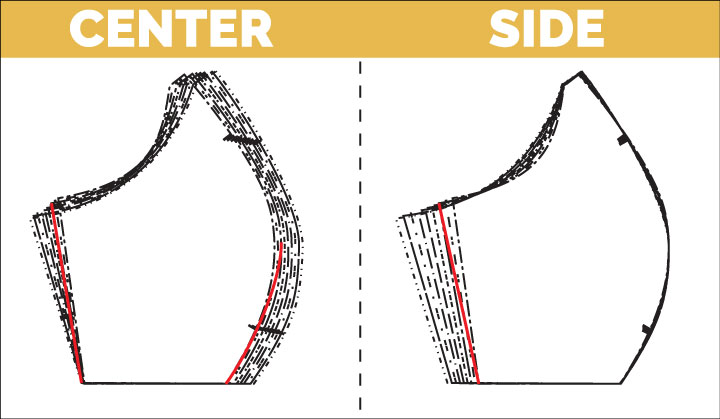
The center of the pattern piece counts as an alignment point. You can blend pattern pieces with either of these styles of alignment.
When pieces are aligned in the center, you have to blend on both sides of the pattern piece, as shown here. For patterns aligned to one side or the other, you only have to blend from one side.
Dos and Don’ts
Do
- Take accurate measurements
- Use layered printing to print only the sizes you need when possible.
- Think about length! My patterns don’t vary much in length because they are drafted for petites, but with other patterns this is something to consider. For instance, if I am grading from a 2 in the waist to a 6 in the hip of a garment I will usually keep the length of the size 2 even though I am at the width of the size 6 because I know I am on the shorter side. This works the other way around as well.
- Blend in other places too! Know you have larger calves? Blend out below the knee! Small wrists? Blend down below the elbow on a sleeve.
Don’t
- Forget about little pieces like pockets, facings, etc.
- Blend too quickly. Blend lines should be fluid, not angular. When blending from the bust to the waist consider doing a full bust adjustment instead if the size difference is more than one or two sizes.
- Blend unaligned pattern pieces (see above)
But how do I do it?!
Now that you know all the caveats involved with blending sizes, let’s take a look at how it’s done:
A note about the Audie playsuit:
When thinking about how this applies to the Audie Playsuit in particular, there are a few things to keep in mind.
- This is essentially a jumpsuit, so there are three main areas you could be blending to/from: bust, waist, and hip. The same would be true for any full length garment (i.e. a dress).
- There are a lot of pieces involved so be sure to stay focused in order to blend accurately. For instance: if blending from the bust to the waist, you have the center front, side front, side back, and center back pattern pieces to think about.
- When slash pockets are involved, fold the pocket piece in half and line up the pocket and front pant pieces using the hip notch provided, the slash pocket seam, and the top of the waistline. Temporarily tape pattern pieces in place when you blend to make adjustments to multiple pieces at once. You can see this in action in the video above.
I hope you found this meaty post super helpful to guide you along all your size blending adventures!
Next week I’ll be sharing construction tips to get you through sewing up the bust!
Happy Sewing!

Leave a Reply